Do you want to replace an old cartridge so that you constantly browse phono cartridge reviews? For any new cartridge, a number of steps must be taken including wiring. Different cartridge types and models might implement various schemes for wire connections between the cartridge and turntable’s tonearm. These wires are used to send the signal into a built-in preamp section or directly to the external amp / AV receiver.
The similar cartridge models might have different color schemes and wire leads. However, in general, the wiring procedure is similar for phono cartridges of different construction and a mounting method.
Performed correctly, the phono cartridge wiring lets you get the pure signal path and optimal sound. On another hand, the incorrect connection of wires will immediately result in the loss of highs and dumbness of a channel. It’s no good experimenting with the wiring scheme though, as improper connection wears down the cartridge and might affect the turntable operation as well.
The way the connections are positioned on the cartridge / tonearm is called the pin layout (or pinout). The most common is the square layout. In some cartridge models, a staggered pinout is used. In the latter, the pins are located under each other but on different sides signalizing the channel connections layout.
Phono Cartridge Wiring Process
Before you’re taking a lead and try to wire it, make sure you have the necessary equipment. The wire connectors have a small diameter and are quite slippery in the fingers. It’s good to have a pair of tongs (better with curved tips) to deal with them. In order to connect your phono cartridge wires, take the following steps:
- Make sure you can see clearly both the tonearm and cartridge connections. If it’s impossible to dismount the cartridge or tonearm, you might need to use a mirror to see the site in full.
- Take the cable connector with tongs and insert it into the tonearm plug. Make sure to propel it for 1.5mm to establish a solid connection.
- Repeat with the other three leads. Connect wires in the correct order using the diagram applicable for your cartridge.
Phono Cartridge Wiring Diagram
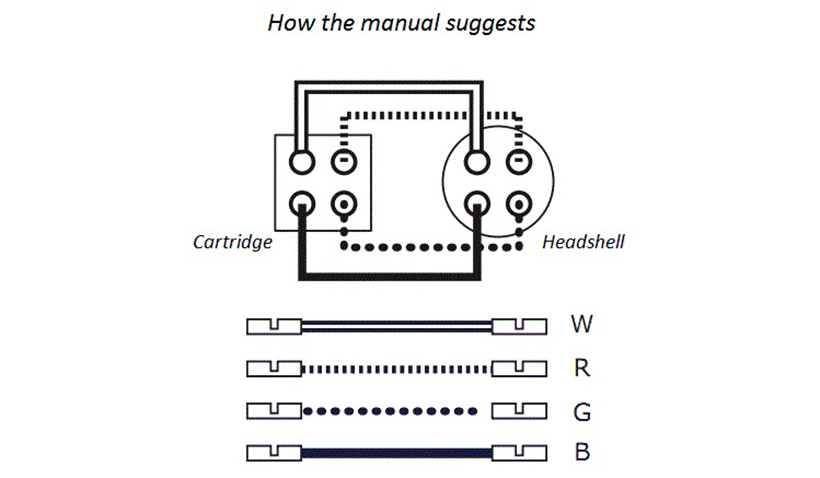
The standard diagram for wiring the H-4 cartridge. The wires are connected in a cross-mirrored way connecting the same pins (left to left, and top to top) of tonearm and cartridge. Pay attention that the tonearm and cartridge are both facing up with their pins.
Color Code for Phono Cartridge Wiring
Another way to ensure the correct leads’ hookup between the phono cartridge and turntable’s tonearm is using the color code. While for the majority of cartridge models the color coding is standard, some manufacturers might apply a different color scheme. The latter should be specified in the manual. The standard colors for cartridge wires go as follows:
- White — wires the left top pin, phase positive.
- Red — wires the right top pin, phase positive.
- Blue — wires the left bottom pin, ground.
- Green — wires the right bottom pin, ground.

Hi everyone! I’m Thomas Moody, also known as Guitarzan.